4. x-utest报告接口
4.2. 认证接口
功能:生成token以授权接口的调用
路径:
/testdata/api-auth/
传入参数:
- app_id
- app_key
请求方法:POST
返回值:
{
    "code": 200,
    "msg": "",
    "data": {
        "user": null,
        "u_name": null,
        "user_id": null,
        "token": "7c45fc98391311e78e1a00163e006b26",
        "ip": "113.57.119.51",
        "user_agent": null,
        "rc_time": "2017-05-15 10:09:11",
        "c_type": 4,
        "app_id": "3832f354872411e6a7c700163e006b26",
        "last_use_time": "2017-05-15 07:22:54",
        "finger_prt": null,
        "c_name": "api",
        "id": "59190dc747fc890ec5ba42e0",
        "is_del": false,
        "cookie": null,
        "del_time": "2017-05-15 10:09:11"
    }
}
其中最重要的是:
- token 后续进行接口调用的授权值
4.3. 数据接口
x-utest系统提供了报告上行接口。
接口路径:
/testdata/create-test-data/
token认证: 需要,token放url里面
请求方式: POST
请求参数:
{
    "pro_id": "57a835c8c6e905166da94243",
    "pro_version":"1.3.4.5",
    "run_time": 51.77724599838257,

    "was_successful": false,
    "total": 88,
    "skipped": 7,
    "errors": 0,
    "failures": 10,

    "details": [
        {
            "status": "failures",
            "note": "AssertionError: 访问不合法,返回404",
            "explain": "只是用于测试的Demo,没有太多意义",
            "test_case": "test_nginx_config"
        },
        {},
        {}
    ]
}
以上的请求参数分为两部分:
- 单元测试框架标准结果部分
- 自动化测试项目后期添加
其中:
- pro_id 项目在x-utest系统中的id代号
- pro_version 被测对象的唯一版本号
- run_time 运行所有脚本花费的时间
测试统计信息:
- was_successful 整个过程是否成功
- total 全部的测试用例总数
- skipped 跳过的用例数
- errors 执行出现代码错误的用例数
- failures 用例判定为失败的用例数
- details 有问题的用例的详细输出信息列表
关于 details 里面的字段解释:
- test_case 测试用例函数名称
- status 测试用例执行结果状态
- 主要包含如下几种状态:
- errors 执行错误的用例
- failures 断言为失败的用例
- skipped 跳过的用例
- explain 测试函数的整体备注解释文档
- note 测试函数里面具体的assert断言的msg备注点
属于自动化测试项目后期运算出来的数据,其它的则是标准的单元测试框架提供的测试结果中自带内容。
上传数据成功后的返回值:
{"code":200,"msg":"success","data":""}
4.4. 提取测试结果
本小节以 pyunit 单元测试框架为例子,来对测试报告所需要的内容进行提取。
4.4.1. 主要内容
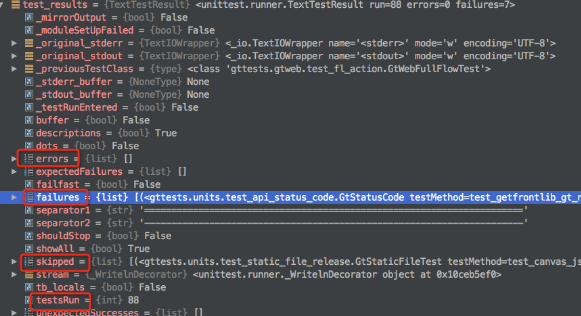
TextTestResult 结果中包含的如下内容:
- errors 错误详细信息列表
- failures 运行失败详细信息列表
- skipped 跳过的详细信息列表
- testsRun 运行的用例总数
具体如下图所示:
4.4.2. 具体条目
以 failures 为例子:

本测试用例的描述:
编号 索引为0 的数据:
- _testMethodName 测试函数名称
- _testMethodDoc 测试函数的文档,这里面一般陈述本测试的功能
打印出来的堆栈错误信息:
- 编号 索引为1 的数据。
4.4.3. 提取方法
对测试结果进行内容提取,同时加入如下内容:
- 测试执行时间
- 项目ID
- 项目版本号
进行标准化格式打包。
代码:
def dict_encode_test_results(test_results, **kwargs):
    """
    将测试结果进行json编码
    :param test_results:
    :type test_results:  unittest.TestResult
    :return:
    """

    run_time = kwargs.get('run_time', None)
    pro_id = kwargs.get('pro_id', None)
    pro_version = kwargs.get('pro_version', None)

    # 主体部分
    res_dict = dict(
        # was_successful=True if test_results.wasSuccessful() else False,
        was_successful=test_results.wasSuccessful(),
        total=test_results.testsRun,
        failures=len(test_results.failures),
        errors=len(test_results.errors),
        skipped=len(test_results.skipped),
        run_time=run_time,
        pro_id=pro_id,
        pro_version=pro_version
    )

    # 详细信息部分
    failure_list = []  # 失败的内容
    for x in test_results.failures:
        note_data = {
            'test_case': x[0]._testMethodName,
            'explain': x[0]._testMethodDoc.rstrip('\n        :return:'),
            'status': 'failures',
            'note': x[1]
        }

        failure_list.append(note_data)

    for i in test_results.errors:
        note_data = {
            'test_case': i[0]._testMethodName,
            'explain': i[0]._testMethodDoc.rstrip('\n        :return:'),
            'status': 'errors',
            'note': i[1]
        }
        failure_list.append(note_data)

    res_dict['details'] = failure_list

    return res_dict
可以提到一个如下的字典对象:
test_res_dict = {
    "pro_version": "1.16.10.10.1",
    "pro_id": "57fa12ec47fc894ee04a2c69",  # 在后台管理系统中组织信息详细信息里面可以查看到:项目ID
    "run_time": 51.772,

    "was_successful": False,
    "skipped": 2,
    "errors": 1,
    "failures": 1,
    "total": 5,

    "details": [
        {
            "status": "failures",
            "note": "AssertionError: 访问不合法,返回404",
            "explain": "只是用于测试的Demo,没有太多意义",
            "test_case": "test_nginx_config"
        }
    ]
}
4.5. 对接x-utest
主要步骤如下:
- 使用微信在首页扫码进行注册或者登录
- 【资产管理】-【项目信息】查看到 项目编号
- 查看 app_id 和 app_key
依据x-utest系统提供的API进行接口调用,可将 判定测试 的结果上传到 测试报告系统服务器 数据库,即可生成 软件系统量化线路图 和 精美测试报表服务 。